There are many reasons as to why you might want to renovate your bathroom. Whether it is to add money to the house, or if it is just to get rid of that old bath you’re tired of looking at. Whatever the reason, the whole process may seem daunting so below we have listed the 4 main steps that are needed to get yourself the new bathroom you’ve always dreamed of.
How much to renovate a bathroom?
Prices very much depend on the size of your bathroom and what type of materials are needed. However, if you’d like to phone us, we can find out exactly what it is you need done and will be able to give you an affordable quote.
Steps for renovating a bathroom
Once the room is stripped back to basics, the following steps are needed:
Electrician – The first stage of your bathroom renovation is to have your electrics safely in place. This is where you need to consider the following; what lighting fixtures you would like to have? Making sure your light installation is outside the damp and wet locations of the room etc. It is also important to many people today to include a ventilation fan in your bathroom in order to help reduce the moisture and any potential odours.
Looking for a professional and affordable electrician in Bexley? Pavey Electricals Ltd is legally certified and insured to handle both Domestic & Commercial electrical inquiries.
Plumbing – Whilst walls are still bare, and the floor hasn’t been laid, the second phase to renovating your bathroom is the plumbing and making sure all water lines are running smoothly and safe. This includes drainage rough ins put in place which are to be connected to the main pipe, usually found underneath the floor. There are many laws and regulations which much be obeyed when doing this which is why you must have this carried out by a professional licensed plumbing firm.
Plastering – Once the electrics and water lines are all safely in place, the walls and ceilings can be plastered. This is the part of the process where you gain your silky-smooth walls and ceiling. This job can also become very messy especially if adhesives are needed before applying the plaster which is why it is always recommended using a professional to carry out this stage. Once the plaster has been applied it is important to wait for it to be completely dry before tiling or painting. This very much depends on how much airflow passes through the room, the size of the room, and how much sunlight the room receives.
Need a professional plasterer in Kent? Rays Plastering Ltd is offers plastering, coving and plaster-boarding services.
Tiling – When it comes to installing a new bathroom, tiles are said to be the best material that can be used, whether it is for the walls or the floor. There are so many options to choose from including porcelain, ceramic, mosaics, stone tiles and more. You can do this before you decide on what colour and size you would like to go for.
For a professional and affordable tiler in London, CMD Ceramics are London’s #1.
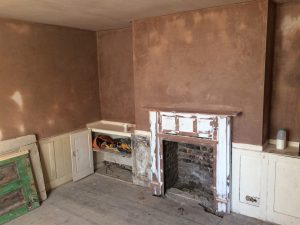
After collaborating with one of our home renovating contractors, we are proud to showcase some of the final pieces in this ideal place in Vicarage place within Margate, Kent. All credits for images go to Hawthorne Homes and the listing is currently available on their website under Vicarage Place for sale.
After initially viewing the property, it was clear the house was in need of plastering throughout the house as you can see from the images below.
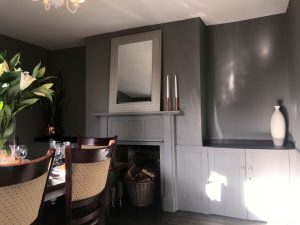
During the course of plastering the property, two full coats of plastering was applied to the walls and ceiling.
After a lick of paint and some refurbishing, this particular room had been completed transformed.
The current asking price for the property is £295,000 boasting a variety of features such as:
Arranged over 3 floors.
Period and character full property.
New roof.
New electrics.
New plumbing and drains with combination boiler – Valient.
New fully fitted kitchen and bathroom, both with underfloor heating
Turn Key – Ready to move in.
Chain free – Can complete the sale in 28 days.
All works completed through Listed Building Control and Building Control, all documents provided, along with guarantees.
We have gone above and beyond spending endless hours (just kidding) making our very new promo video thanks to PowToon and their amazing online tool! I’d advise anyone wanting something similar to register an account today and log on to promote their very own plastering promotion video! Registration takes a few minutes and you can load up one of their readily used templates that can easily be modified to add your own text, icons & images.
Here is a preview of our new promotional video for plasterer kent.
Rays Plastering Ltd
179 Yorkland Avenue
Welling, Kent
DA16 2LQ
England, UK 07970 475170
Services We Offer:
Just to make a quick breakdown of all the services for plastering that we offer. Rays Plastering Ltd works on in-door plastering, so that would cover a broad range of different plastering services out there such as:
Skimming
Bonding
Plaster-boarding
Repair Work
Coving
All of our different services can be see by going to our services page which can give a lot more details about each particular type of service which you may need. We cover an extremely large region including Kent & South East London but check out our areas we serve. If you have any doubts on whether we service your location or not please feel free to call Ray on 07970 475170 or send us an email at info@raysplastering.co.uk
Artex is simply a coat or layer used on ceilings to give a different appearance. Usually found it easier a swirl format or a scattered random stone type. It was originally designed as a visually appealing type of interior design, but general opinion (mostly from my experiences) has come to soon dislike the taste of it in there homes nowadays.
Below is an image showing a real-life example of what artex is to give you a clearer understanding.
In the land of tradesmen, a lot of words get thrown around with terms being used all over the place. Sometimes it may get confusing and simply you don’t understand what certain things mean. Not to worry, we are here to help!
It is relatively quite simple:
Plastering – The term plastering is more of a generic term used by plasterers which could include the following:
Skimming
Bonding
Coving
Boarding / Plaster-boarding
Whereas, skimming is more of a specific term used for a specific plastering task. ‘Skimming’ refers to the process where a final layer (or two) of ‘plaster’ or British Gypsum Thistle Multi-Finish is applied to a wall or ceiling to give it a smooth finish. Usually skimming a ceiling or wall would contain 2 or 3 different layers. The first being fairly ‘rough’ as this layer is to be applied over the whole wall.
Whereas the second and/or last layer would be a smooth layer of plaster to really finialise the give off a smooth finish for the plastered wall. Reasoning behind using a really fine, smooth finish for the final layer is so that any painting/wallpaper applied once dried does not have any bumps, giving a smooth finish to the wall.
Skimming over plasterboard though would only require one layer of plaster as the surface is already smooth enough to go through on a finishing coat.
Wow. Maybe I’ve bitten off more than I can chew here, but I’ll try and resolve some of the main topics in regards to the advantages & disadvantages of plastering in this single blog post. Here we go!
Advantages of Plastering
I’ve collaborated a list of advantages from multiple areas around the plastering trade and here is what we’ve established:
Great finish for homes to look amazing & ready to be painted
Lasts for at least 15 years
Rewarding! We love to look back at our work and see our work in your home/business!
More insulation for your home
Disadvantages of Plastering
If done by a sloppy plasterer, can become messy
May take a while if multiple rooms are being plastered
Can be somewhat costly dependent on the work/tradesman you’ve hired
Tiresome, if you’re doing it yourself, you are in for a real treat!
Plastering is a trade for coating & fixing walls, ceilings and other surface areas. There are a few things that you need to get started before starting.
Materials & tools used for plastering
Here are some of the few basics to get you on your way to get plastering:
These are the bare minimal essentials that you need in order to get you started when plastering. The British Gypsum Thistle Multi Finish Plaster or similar alternatives can be bought from common retailers such as Wickes or B&Q.
Best of luck starting your new adventure plastering, it may take a few tries but keep going until you get that perfect finish!
Are you seeing something like this in one of your rooms and can’t stand it? Look no further! Our easy How-To guide shows you how to fix small wall cracks and make your room go back to tip-top shape in no time.
Everyone has started somewhere being a ‘newbie’, so don’t feel ashamed or embarrassed if its your first time for fixing anything plastering related, we all start somewhere! Anyway, by the time you’ve finished reading your blog post, you’ll be wandering why you hadn’t done these small jobs around the house anytime sooner! We’ve looked at a load of different resources in how to give our audience the best type of advice when it comes to fixing wall cracks and here is a great video outlining how to do so in the most effective manner.
See how easy that was?!
Clean the surface out first, apply some scrim tape, mix up some plaster in a small bucket with water and British Gypsum Plaster and apply carefully with a trowel.
Let the plaster set into the crack for a few days as to let it fully dry out, then you’ll see it turn a pinky brown colour. From here on out, it’s plain-sailing all the way and you’ll be good to start painting over the plaster to match with the rest of the existing wall.
Equipment For Fixing Wall Cracks:
Here’s a list of all the equipment that was used within the tutorial:
Screwdriver
Trowel
Sandblock
Sanding paper
Drywall Compound
Bucket / Holder
Masking Tape
Paint Brush
Primer Paint
Wall (matching colour to existing wall) paint
Although not all bumps, damages and cracks to walls are the same, from the video provided you can get an idea of how to fix any damaged walls with a simple step by step procedure. If the damage to the wall is much bigger, this could require a completely different type of repair and therefore we advise you to seek your nearest plasterer / drywall contractor that might be willing to come and offer a fixed quote. Beware, some companies charge a call out fee, so it might be sensible to call and ask them if they offer free quotations before calling them out to quote on any job you may need done.
* Many thanks to MonkeySee who have provided the guide for the ‘How To’ video.